Arts and Craft for Kids
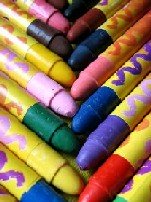
Here are some simple arts and craft for kids. These ideas will help your child learn and discover the creativity in them. More ideas will be added from time to time, so do remember to check back often.
Caterpillars craft
Materials :
- empty egg carton
- pipe cleaners
- markers or crayons or paints
- glue
- scissors
- construction paper
- beads or dried pasta
- paper hole puncher
Instructions :
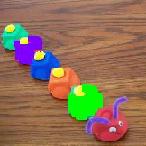
1. Cut the egg holder portion of the carton lengthwise so there are two, six-section halves.
2. Punch holes in the top of the front section for the antenae and insert pipe cleaners and twirl for desired shape.
3. Punch holes along the bottom and attach pipe cleaners for legs on the caterpillar.
4. Decorate caterpillar as desired by child and age level. Can paint, color or add construction paper pieces to get desired "look".
5. Draw or glue beads or pasta pieces on for face.
Making your own stickers
Materials :
- magazines and catalogs
- white vinegar
- white glue
Instructions :
1. Cut out cartoons or any nice pictures from old magazines or catalogs.
2. Take 2 parts of white glue to 1 part of white vinegar and mix together.
3. Apply the mixture to the back of the pictures and let it dry.
4. When you are ready to stick them, just moisten the glue side and press.
Pasta Arts and Craft for Kids
Materials :
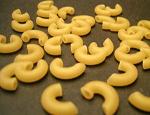
- macaroni
- rubbing alcohol
- food coloring
- disposable containers
Instructions :
1. Mix about 5-6 drops of food coloring and 1 tablespoons of rubbing alcohol in a disposable container. Use different containers for different colors.
2. Add a cup of macaroni and mix thoroughly.
3. Remove the macaroni and spread out on paper towels to dry overnight.
4. Once dry, string the pasta to make jewelry or glue to cardboards to create pictures or as decoration for cards and photo frames.
Toothpick Cactus Craft
Materials :
- green construction paper
- toothpicks
- glue
- paintbrushes
- scissors
- colored tissue paper
- sand
Instructions :
- Trace a simple cactus shape on pieces of green construction paper.
- Cut out a cactus for each child; older children can cut out their own.
- Have children glue the cactus onto another piece of paper (any color).
- Have them "paint" the glue onto the cactus with paintbrushes, then glue on the toothpicks (to make the cactus needles).
- Tear and squish up small pieces of colored tissue paper to glue on as flowers.
- Paint glue under and/or around the cactus and sprinkle sand to look like the desert.

Alphabet Scrapbook
Materials :
- old scrapbook or photo album
- old magazines
- scissors
- glue
Instructions :
1. Take a scrapbook or photo album and on each page write a letter of the alphabet starting at A through Z.
2. Then with your child look through magazines for pictures of things and put them on the pages with the same first letter. An example would be a picture of an airplane on A etc.
3. Cut out the pictures and glue onto the respective pages. If you use photoalbums with the cling plastic covering, no gluing is involved.
4. Your child will now has his very own alphabet book that he helped to make.
Note : For this arts and craft for kids, you can also create other themes such as occupation, transportation, food, etc.
PAPER TREES
Materials :
- small brown paper bag
- small pieces of green colored tissue paper
- glue
Instructions :
1. Take the brown paper bag and twist the bag, as to form a tree trunk.
2. Once twisted, begin ripping the top part of the bag into small tree branches.
This is done by tearing the bag and then twisting each torn part.
3. Once the branches are formed, glue pieces of green tissue paper onto the branches as to form leaves.
Icicle "Drip" Painting
Materials :
- blue construction paper
- white tempra
- plastic spoon
- newspaper
Instructions :
1. Lay a piece of newspaper on the table to collect paint drippings.
2. Make a puddle of white paint, about the size of a penny, at the top of the blue construction paper.
3. Hold the paper at an angle and let it run down the paper so it resembles an icicle. Make larger puddles at other spots on the paper and let those puddles "drip" down the paper to resemble larger icicles.
COLORFUL COASTERS
Materials :
- lids from margarine or yogurt containers
- old greeting cards, postcards, fabric, wrapping paper or magazines
- glue
- scissors
- water-based sealer
- pencil
Instructions :
1. Place a lid over top of a greeting card, magazine page or piece of fabric and trace around the lid with a pencil.
2. Cut out the shape you just traced and glue it to the lid. Repeat on as many lids as you like.
3. Another option is to cut out many tiny pieces of greeting cards, fabric or magazine pages and glue them onto the lid the way you would if you were making a collage.
4. Finally, once the glue has dried, you have to seal the coasters with a water-based sealers to protect them from moisture.

Watermelon arts and craft for kids
Materials :
- paper plates
- red construction paper
- green tempera (or poster)paint
- glue
- black watermelon seeds (dry)
Instructions :
1. Give each child half a paper plate and some green paint.
2. Instruct the kids to paint the rim of the plate green and tell them that this will be the rind of the melon.
3. Then give each child a half-circle of red construction paper (cut to fit the inner part of the paper plate half) and have them glue it in place.
4. Give each child a small pile of watermelon seeds, a dixie cup of glue and a paintbrush.
5. Have them dab dots of glue wherever they want their seeds and they can stick them on.
Enjoy making all these arts and craft for kids!
Other Arts and Craft for kids
Simple Paper Arts and Craft for kids
Ideas for crafts using leaves
Homemade child craft recipes
Fun and educational craft kits for kid



New! Comments
Have your say about what you just read! Leave us a comment in the box below.